How to use Cloudflare to defend against DDoS attacks
This article describes how to use Cloudflare to help defend against DDoS (distributed denial-of-service) attacks on your web site.
About DDoS protection by Cloudflare
DDoS (distributed denial-of-service) attacks are becoming more and more common. In this type of attack, multiple computers flood a target site with so much network traffic that it responds very slowly or not at all.
Cloudflare's distributed, redundant network helps absorb the flood of traffic associated with DDoS attacks. In addition to this built-in DDoS protection, Cloudflare provides additional protections you can enable, such as “Under Attack” mode. This is a security level you enable when your site is under active attack. When enabled, this mode adds additional protections to stop potentially malicious HTTP traffic from reaching your site. Legitimate visitors see the following page for about five seconds while Cloudflare runs checks on the browser:
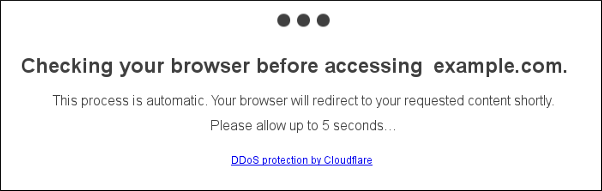
After Cloudflare completes its checks, your site loads normally.
In addition to enabling “Under Attack” mode, you can whitelist specific IP addresses to add an additional layer of defense to your web site. The following sections describe how to do both of these actions.
Enabling “Under Attack” mode in Cloudflare
To enable “Under Attack” mode in Cloudflare, follow these steps:
- Log in to Cloudflare with your Cloudflare account.
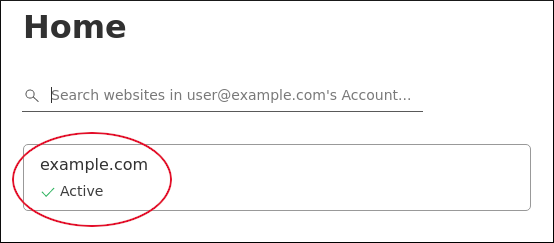
- In the left sidebar, click Websites, and then click your domain name (for example, example.com):
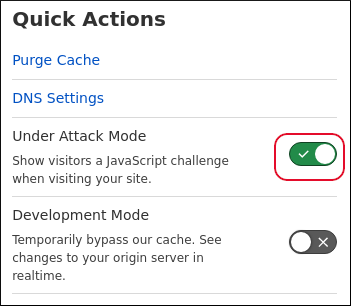
In the right sidebar, under Quick Actions, click the Under Attack Mode slider:
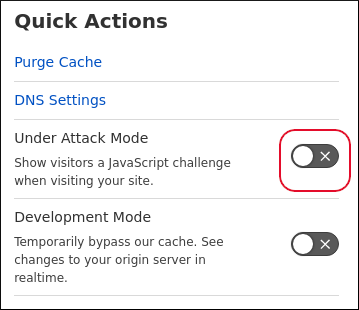
To disable “Under Attack” mode, click the Under Attack Mode slider again, and then select a security level:
 A2 Hosting recommends using the High level after an attack, which means Cloudflare challenges all visitors that have exhibited threatening behavior within the last 14 days. When the attack has lessened or stopped, you can reset the security level to a lower level.
Whitelisting IP addresses
In addition to enabling Cloudflare's “Under Attack” mode, you can prevent malicious IP addresses from accessing your site, and grant access only to specific IP addresses that you trust. This process, also known as “whitelisting”, provides another layer of protection for your site.
To do this, follow these steps:
- Using the cPanel File Manager or the SSH command prompt, open the /home/username/public_html/.htaccess file in your preferred text editor, where username represents your account username.
If the .htaccess file does not already exist, create it.
- Copy the following text and then paste it into the .htaccess file:
order deny,allow
deny from all
Use your web browser to go to https://www.cloudflare.com/ips-v4. Copy the entire list of IP addresses, and then paste it into the .htaccess file right after the deny from all line. Each IP address should be on a separate line.
Cloudflare periodically updates this list of IPv4 addresses for its network. You should whitelist all of these IP addresses to ensure continued Cloudflare functionality for your site.Add the following text to the start of each line that contains an IP address:
allow from
To add additional IP addresses (such as your home or office IP address) to the whitelist, use the same allow from IP_address format.
If you do not know your own IP address, you can visit http://ipfinder.us.You should now have an .htaccess file that contains the following content:
order deny,allow
deny from all
allow from 103.21.244.0/22
[Additional Cloudflare IP addresses to allow]
[Any other IP addresses you want to allow]
Save your changes to the .htaccess file. Whitelisting is now enabled.
To undo whitelisting, comment out the previous statements in the .htaccess file by placing a # character in front of each line (or just delete the lines entirely).
More Information
For general information about Cloudflare, please visit https://www.cloudflare.com.
Article Details
- Level: Beginner
Grow Your Web Business
Subscribe to receive weekly cutting edge tips, strategies, and news you need to grow your web business.
No charge. Unsubscribe anytime.
Did you find this article helpful? Then you'll love our support. Experience the A2 Hosting difference today and get a pre-secured, pre-optimized website. Check out our web hosting plans today.